Homemade Dark Chocolate Nutella {vegan!}

Homemade Dark Chocolate Nutella {vegan} | Kneading Home

My favorite part about being married is the idea that my husband and I get to become our own family, start our own traditions, and build a life on our terms. It's pretty awesome. Obviously, one of our family values is good food. We gladly spend the extra couple cents for organic produce, our favorite date nights revolve around food, and cooking together, however challenging it can be in our little kitchen, is one of our favorite activities.

So last year I, unknowingly, started a tradition by making Nate homemade nutella for christmas. I sneakily bought all the ingredients and whipped it up while he was at work then wrapped it and put it under the tree. It was everything nutella should be and more. It was nutella but fresh and real tasting with texture and warmth from real roasted hazelnuts and creamy melted chocolate, minus the chemicals and preservatives. I remember thinking I never realized how processed nutella tasted until I had the good stuff. 

So this year while we were brainstorming unique gift ideas we knew we had to re-create the homemade nutella. We made the first batch with classic milk chocolate. Then with leftover hazelnuts we figured we'd make ourselves a batch, the only problem was we ran out of milk chocolate. We figured since it was just us we'd experiment with dark chocolate. After some taste tests, we upped the amount of hazelnuts a tad and decreased the amount of chocolate a tad. Then to make up for the added bitterness and decreased sugar from the dark chocolate we added an extra tablespoon of sugar. And tada it was just as good as the original with added richness from the dark chocolate. As we stood over the sink comparing the two while licking the spatula and bowl of the food processor we realized our new version is vegan! 

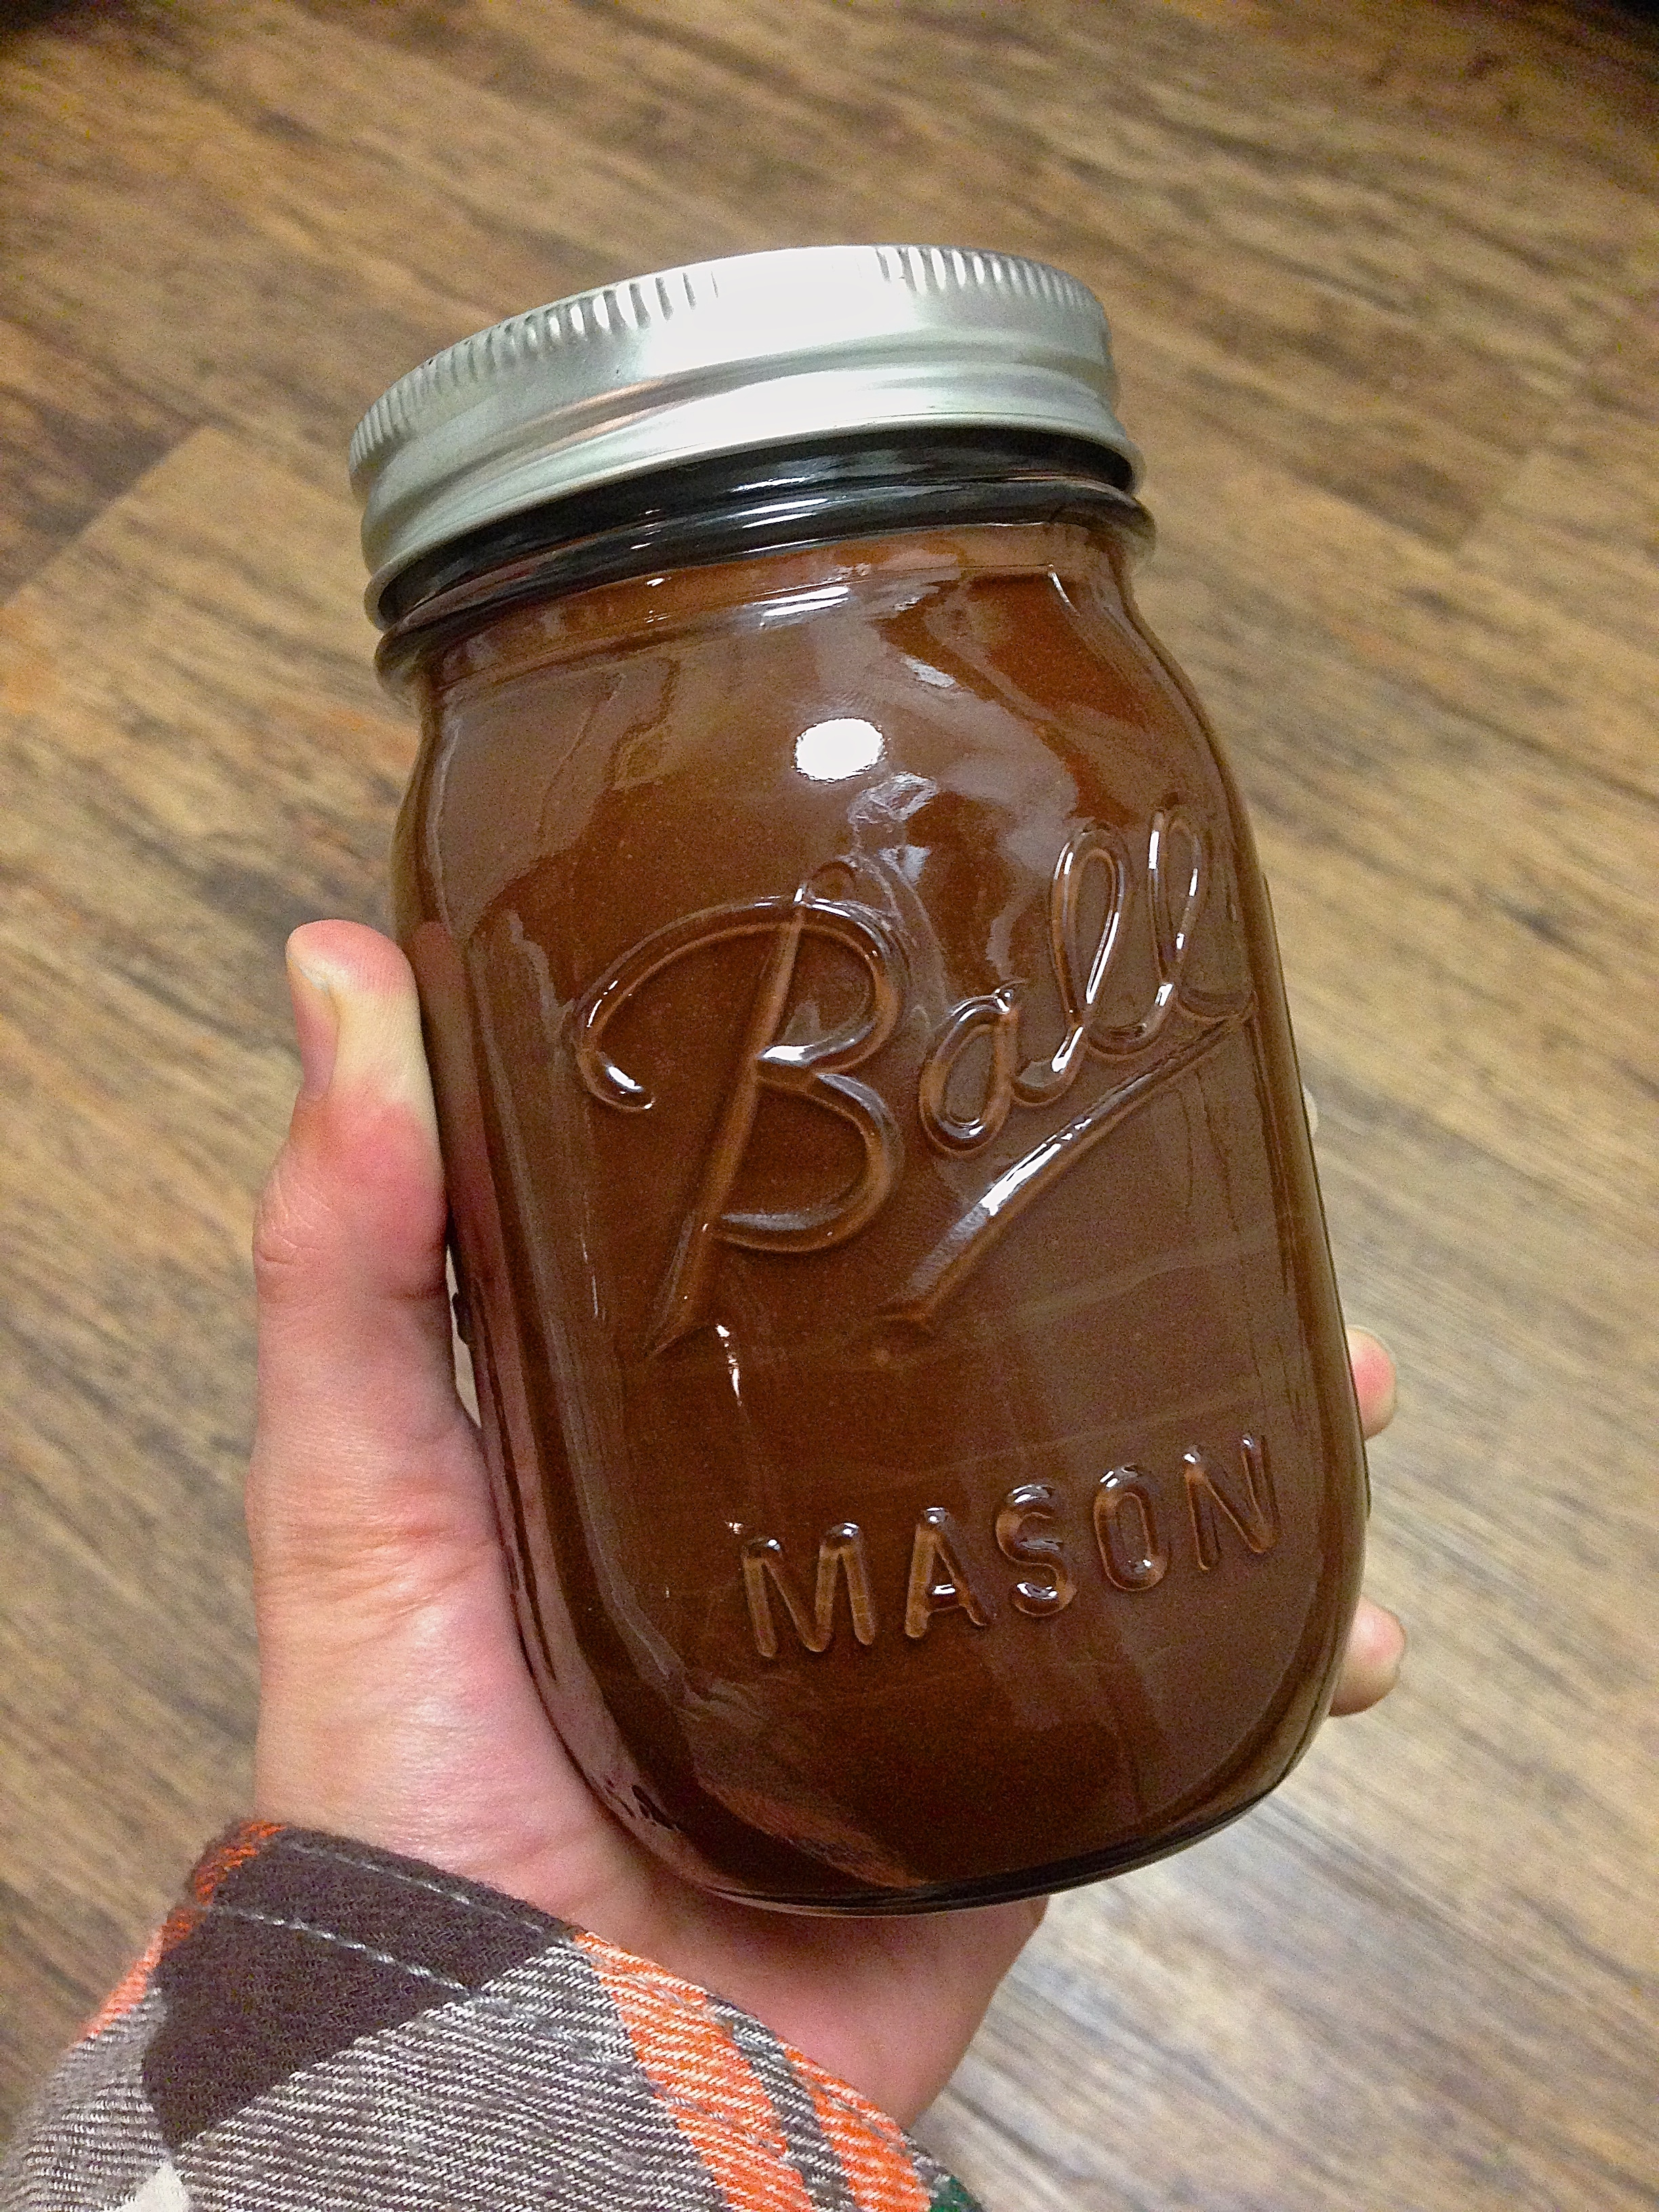
So literally minutes after accidentally creating it, I'm writing to you about homemade dark chocolate nutella: the perfect diy christmas gift. It's so rich, so creamy, and so real tasting. It really does put processed traditional nutella to shame. Because really, what says "I love you, you're special, merry christmas" like a giant jar of homemade nutella? You can bet your chocolate smeared fingers it will be enjoyed until the spoon hits the bottom of the jar! 

Homemade Dark Chocolate Nutella {vegan} | Kneading Home

Homemade Dark Chocolate Nutella {vegan} 
Adapted from Buzzfeed Food 
Makes 1 pint or 2 cups 

3 tbsp baking soda, if your hazelnuts contain skins
1 1/4 roasted hazelnuts
11 oz dark chocolate (I used 55% cocoa) 
3 tbsp grapeseed oil (or canola oil) 
4 tbsp confectioner's sugar - see notes
1 tbsp unsweetened cocoa powder
1/2 tsp vanilla extract
1.5 - 2 tsp sea salt 

Ideally, look for hazelnuts with the skins already removed. If you can only find hazelnuts with the peels intact (like me) you will need to peel them. The easiest peeling method is to bring 2 cups of water to a boil in a medium saucepan. Once water begins to boil add 3 tbsp baking soda, it will foam. Add your hazelnuts and continue to boil for 3 minutes. After 3 minutes, remove 1 nut and test to see if the skin is easily removable. If not, boil longer then retest. Once the hazelnuts are done transfer them to a bowl of ice water. Remove the skins, they should easily peel off, and dry the nuts. 

Toast the hazelnuts at 350 degrees for 5-7 minutes until fragrant and lightly browned, even if your hazelnuts are pre-toasted like mine I still do this step as I feel it boosts the flavor. Set aside. 

Melt chocolate in a double boiler. If, like me, you don't have a double boiler, in a small saucepan, bring an inch of so of water to a bowl. Top saucepan with-heat proof bowl, I used pyrex, making sure it doesn't touch the water. Once the water boils pour the chocolate into the bowl and stir until completely melted. Remove from heat and set aside to cool slightly. 

In a food processor blend hazelnuts and oil until they reach the consistency of smooth paste. You made need to scape down the sides with a spatula a couple times. Add the sugar (starting with 4 tbsp - you can add more later, if needed), cocoa powder, vanilla, and salt and process until completely combined. Pour in the melted chocolate and process until completely smooth and incorporated. Taste and adjust sugar and salt if needed. 


Notes: 
Depending on how dark your chocolate is you may need to add more sugar. I used 55%, so if you're using something much higher you will definitely need to add more sugar to combat the bitterness. We found salt also helped a surprising amount in bringing out the flavors and decreasing the bitterness, so feel free to up that as well. Just taste to gauge. 


Apple, Rosemary, & Sharp Cheddar Galette with Caramelized Shallots in a Buttery Parmesan Crust

Apple, Rosemary & Cheddar Galette | Kneading Home

Guys, less than a week till Christmas. Are you ready? Maybe you're Jewish and don't celebrate Christmas. If that's you, let me say first Happy 4th night of Hanukkah, and second, I have recently developed a crazy intense love for latkes, and for a non-jew the amount of them I've managed to get my hands on in the last week is pretty remarkable. Seriously making me question my catholic upbringing. But anyway, chances are regardless of what holiday you celebrate, you'll probably be attending some festive gatherings in the next two weeks. Lucky for you, I've got the perfect dish. 

I've had a long time fascination with sweet and savory things that don't seem like they'd fit together, but surprisingly pair quite fantastically, making you question everything you thought you knew. For me this is sharp cheddar and apples. Sure they could work together on a cheese plate, but what about all stewed up nice and steamy in a rustic galette? Even better.

For those of you who've never had the opportunity to throw together a galette, or who might not know what it is, it's basically a rustic, no-fuss, much easier version of a pie. No crimping the edges, no rolling out perfectly round measured circles, no covering the crust with tin foil (ain't no body got time for that), and no nervous transferring of a crust to a pie dish. You just mix up your dough, roll it out (and seriously the more imperfect the better here) and throw whatever kind of fillings you like inside. Fold up the edges, again imperfections here add to the rustic-ness, and pop it in the oven. No fuss. The result is handmade and charming. 

Apple, Rosemary & Cheddar Galette | Kneading Home

And the apples and cheddar? They make quite the dynamic duo. And along with toasty caramelized shallots and winter herbs this thing comes out of the oven smelling super cozy. But even though the filling is great, I still think this crust is my favorite part. It's flakey, buttery, with just a the perfect hint of pepper and parmesan. So far this season I've cooked it up for Thanksgiving, a weeknight dinner, and the holiday potluck we had last weekend. 

Apple, Rosemary & Cheddar Galette | Kneading Home

Apple, Rosemary, & Sharp Cheddar Galette with Caramelized Shallots in a Buttery Parmesan Crust
Serves 6 as an appetizer 

For the dough:
1 stick unsalted butter, cubed and frozen for 15 minutes
1 1/4 cups all purpose flour
1/4 cup cornmeal
1 tsp salt
fresh ground pepper
1/4 cup freshly grated Parmigiano-Reggiano
4-5 tbsp cold water
1 tbsp extra virgin olive oil

For the filling: 
3-4 shallots, sliced
1/4 tsp thyme
1 tbsp rosemary
1/4 tsp salt
1 giant, or 2 regular size Honeycrisp apples, peeled & sliced
1 heaping cup grated extra sharp cheddar
1 egg

Make the dough. Pulse flour, cornmeal, salt, pepper and parmesan in a food processor until combined. Add frozen butter chunks and parmesan and pulse until butter breaks up to the size of peas. Add 1/2 the water, pulse, add the other half, pulse, then add the olive oil and pulse until cohesive dough forms. Transfer the dough to a lightly floured work surface and knead 2-3 times, form into a disc, wrap in plastic, and refrigerate for 20-30 minutes and up to two days. 

Meanwhile, heat some olive oil in a small skillet, sauté shallots over medium low heat for 10-15 minutes until soft and golden brown. Set aside. Finely shop thyme and rosemary and mix with salt, set aside. 

Preheat the oven to 375 degrees. Assemble the galette. Cover a flat work surface with a large piece of parchment and lightly dust with flour. Roll out the dough to a 14" imperfect circle - seriously, keeping it a little uneven, with jagged edges adds to the rustic feel. Top with cheddar, leaving about 1/2 inch boarder on all sides. Top cheddar with shallots and 1/2 of the herb salt mixture. Top with apples - I layered mine in two overlapping rows but you could do any design you'd like. Sprinkle with remaining herbs. Using a bench scraper, fold uncovered edges of the galette over. Whisk egg and brush crust with a liberal amount of egg wash. Drizzle entire galette with olive oil, freshly grated parmesan, and salt & pepper. 

Transfer galette, keeping it on the parchment paper, to a large baking sheet. And cook for 50-60 minutes until the crust is golden brown. Let cool about 10 minutes and serve. 

Notes: 

  • Photos updated November 2016
  • The galette is just as great at room temperature as it is warm. 
  • Reheats best in the toaster oven. 


Holiday Gift Guide: A Kitchen Edition

I'm a big believer in the idea that you don't need a big fancy kitchen, expensive pots & pans and top of the line gadgets to make fantastic food. I'm super proud of the amount of food that comes out of my little apartment-size kitchen, and I've found acquiring a few simple tools, most of which I use daily, can make a huge difference. So if you're still looking for that perfect stocking-stuffer, a great gift for your favorite cook, or even some starter kitchen basics for a college student, let this be your guide:

Mini Measure Shot Glass$2.97 (on sale now) - My mom got me one of these last year for christmas and I seriously don't know how I lived without it. I literally use it 365 days a year, usually multiple times a day. For baking and cooking this thing is a gem. 

Microplane Zester, $12.38 - This is an absolute necessity for any cook. It zests citrus like a breeze, finely grates parmigiano reggiano into pillowy piles, grates tough ginger, and even zests dark chocolate for topping desserts. The blades are super sharp so you don't have to work hard to grate food. Every kitchen needs one. 

Provencal Stonewall Salt Crock, $12.95 - Nate got me this salt crock for Christmas last year and I love it. It's a small detail that's really improved the efficiency of my kitchen. Having it filled next to the stove makes grabbing a pinch of salt at a moment's notice so easy and it's perfect for dunking my measuring spoons in for baking. Also it's pretty and french. 

10" Lodge Cast Iron Skillet, $14.97 - Lodge skillets are made in the USA, affordable, reliable, and ever so necessary for every kitchen. We love cooking in cast iron. Cast iron gives great heat distribution, gets super hot for frying, and it easily works on the stove top, in the oven, and over a camp fire. So versatile. We make cornbread in it, fry eggplant, bake puffy pancakes, and latkes. We have a mini one which makes the perfect fried eggs as well as giant chocolate chip cookies for two. 

Silicone Baking Mats, $15.12 for two - I got these for Christmas last year and use them all the time. You'll never have to buy parchment paper or cooking oil again. Nothing sticks to these, and they make clean up a breeze. They are essential for cookies or baked goods of any kind. 

Chef'n Citrus Juicer, $23.08 - I put off buying this juicer for years. Somehow I just couldn't justify spending almost $25 for something as silly as a juice press. I finally splurged a couple months ago, and I use this thing every single day. It squeezes out every last bit of juice with just a gentle squeeze. It produces zero mess and is easy to clean. I'll never go back to anything else. 

Non-slip Epicurean Cutting Boards, $24.99 - $39.99 - These cutting boards are fantastic. We have them in three sizes; they are high-quality, non-slip, and dishwasher safe. These boards won't dull your knives, and the best thing about them is they require zero maintenance. One good cutting board and a good chef's knife are probably the two most important things in a kitchen, period. 

Peugeot 7-inch Salt & Pepper Mills, Chocolate, $36.99 each - We bought these with money from our wedding about two years ago and love them. They are a great investment, really high quality and will last a lifetime. They live next to our stove and are used daily. The dark chocolate color is so classic and looks sophisticated and timeless on the table. 

Marble Pastry Board, $44.95 - Although it's definitely not a necessity, I adore this pastry board. It lives on top of two of my burners, which provides much appreciated extra counter space. It's beautiful, sturdy, and perfect for the baker in your life. I never have to worry about clearing a space on the counter to roll out dough, I just toss some flour on this board and start rolling. This size fits perfectly in my fridge, which matters, because technically you want to have the option to pop it in there - you know, to keep those beautiful chunks of butter from melting in your pie crusts. Also, if you're into instagraming your culinary creations like I am, it makes the perfect background - no one will know you don't have fancy marble countertops!  

9-cup Cuisinart Food Processor, $149 - I use my food processor probably 3-5 times a week for everything from pureeing chickpeas for hummus and pulsing ingredients for falafel. It's essential for pie crust. The attachments grate cheese in seconds, shred potatoes for latkes, and zucchini for zucchini bread.  I don't know how I functioned before I owned a food processor. 

Advantage Components Pot Rack, $219 - I invested in this pot rack last summer because I found our pots and pans were getting scratched up after being shoved in a cabinet. They were also taking up precious storage space in our tiny kitchen. At the time, my husband thought it was a totally unnecessary purchase but after having it for almost two years even he admits our kitchen couldn't function without it. It's an easy way to create extra storage in a tight kitchen, it looks nice, and it doubles as a drying rack - just wash and hang! This particular one is expandable, so if one day we have a big kitchen we can expand it wider to fit the space. 

Le Creuset Dutch Ovens, $240 - $330 I am fortunate enough to have two of these beauties and I must say they are hands down my favorite thing about my kitchen. French-made, they are a gift that can be passed down generation after generation. If well-maintained, they will last forever. They are made of heavy duty cast iron so you get the even heat distribution and versatility of going from the stove to the oven to the table, but because of the enamel coating they require zero maintenance and are a breeze to clean. They are perfect for slow cooking, braising, frying, soups, and one pot meals. The moment the seasons change in the Fall, my Le Crueset makes its home almost permanently out on my stovetop. On top of all of this, the colors are gorgeous. I just splurged on a 3.5 quart in burgundy which is perfect for one pot meals for 2-4, cooking beans, hot chocolate, baked apples, or mulling cider and wine. I've had a 7.25 quart in Marseille which is a work horse - perfect for soup and stews, and large one pot meals. These make an incredible gift for any cook.